Onboard Microsoft Entra Applications
This guide walks application owners through how to onboard new Microsoft Entra applications using the Onboard Azure Application wizard in the Resource Admin portal. Onboarding applications through this workflow registers them with your Microsoft Entra tenant and links them to EmpowerID for lifecycle and access management.
What You'll Need
| Requirement | Description |
|---|---|
| Access | You must have permission to access applications in Resource Admin and manage applications for your Azure tenant. |
| Tenant Access | The Azure tenant must already be registered in EmpowerID. |
Steps to Onboard a New Entra Application
1. Launch the Onboard Microsoft Entra Application Workflow
Begin the onboarding process by launching the wizard from the Applications section of the EmpowerID Resource Admin portal. The wizard guides you through each configuration screen for registering the app in Microsoft Entra and EmpowerID.
- Log in to the Resource Admin portal in your EmpowerID environment.
- From the Resource Type dropdown, select Applications.
- Under Filters, click Onboard Application, then select Onboard Microsoft Entra Application.
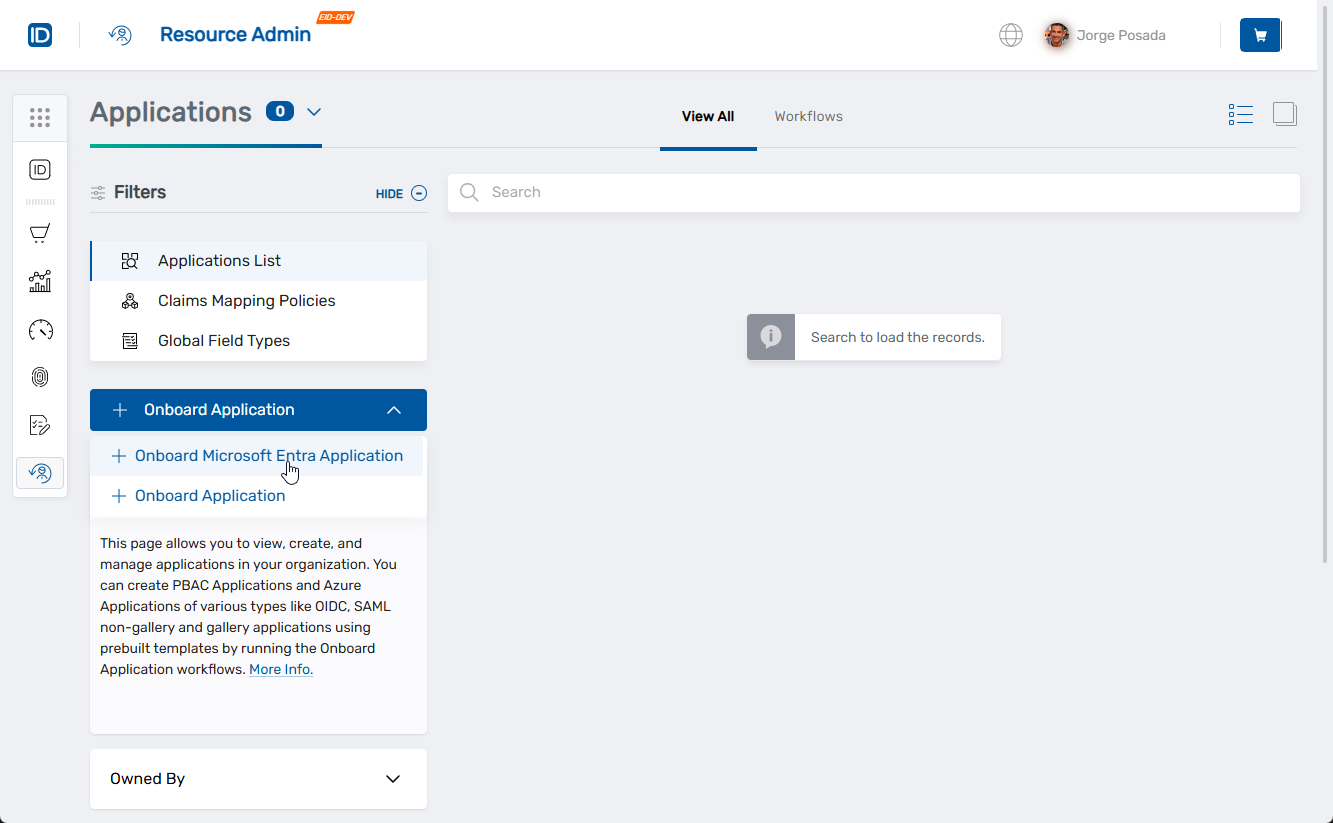 This opens the Create Microsoft Entra Application wizard. You’ll begin on the Application Type step.
2. Select the Integration Type, Environment, and Location
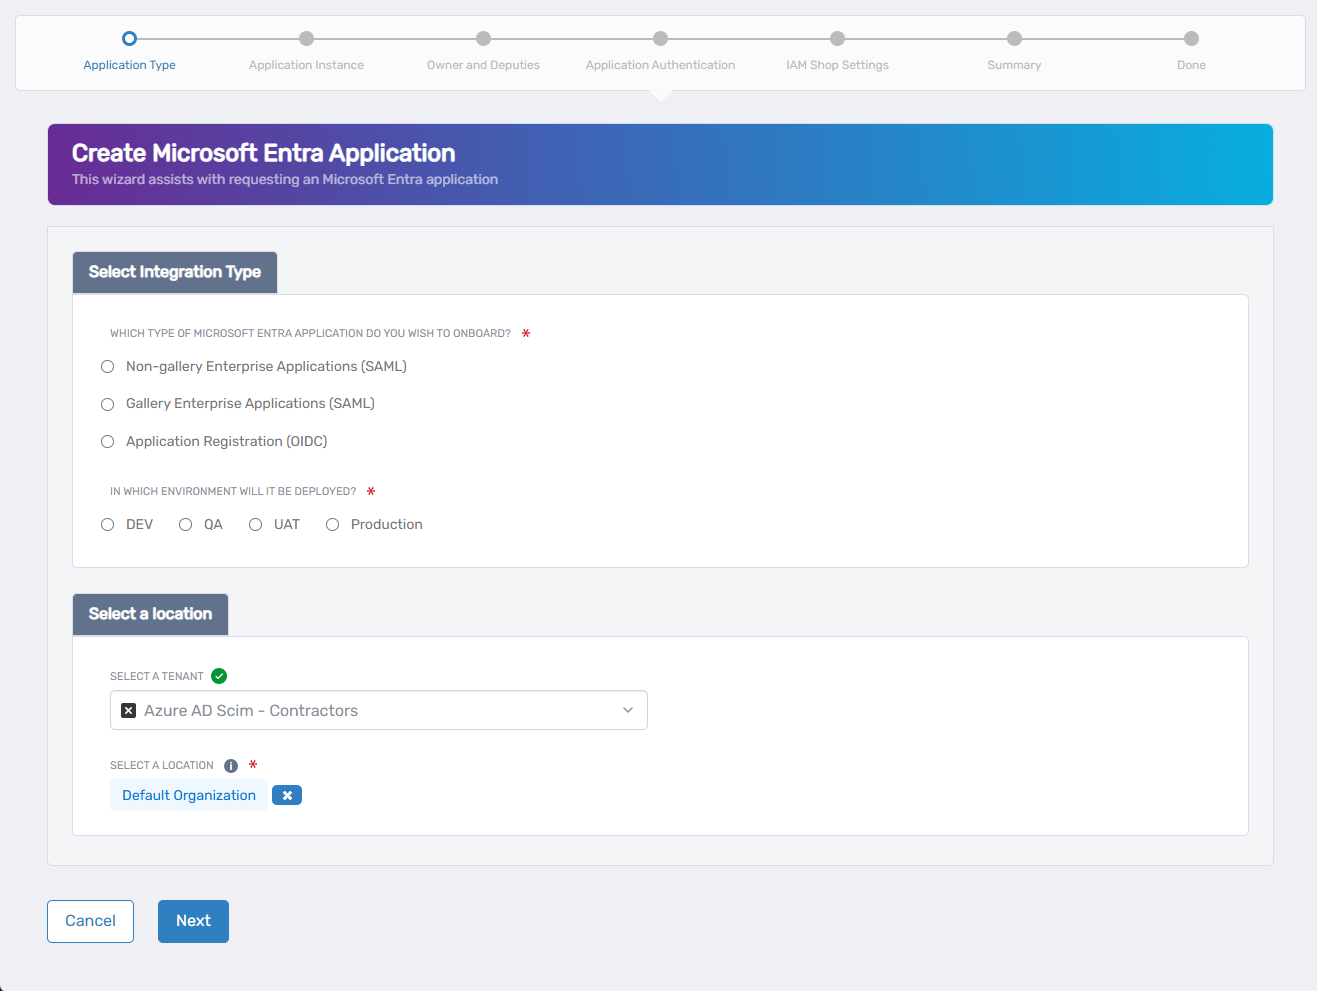
On this screen, define how the application integrates with Microsoft Entra and assign its environment and administrative location.
-
Under Which Type of Azure Application Do You Wish to Onboard?, choose one of the following:
- Non-gallery Enterprise Applications (SAML) - For custom SAML apps not listed in the Microsoft gallery.
- Gallery Enterprise Applications (SAML) - For predefined SAML apps in the Microsoft app gallery.
- Application Registration (OIDC) - For modern apps using OpenID Connect or OAuth 2.0.
-
Under In Which Environment Will It Be Deployed?, select the environment tag (e.g., Dev, Test, Production). This value is metadata only and does not affect Azure deployment.
-
Under Select a Tenant, search for and select your Microsoft Entra tenant.
-
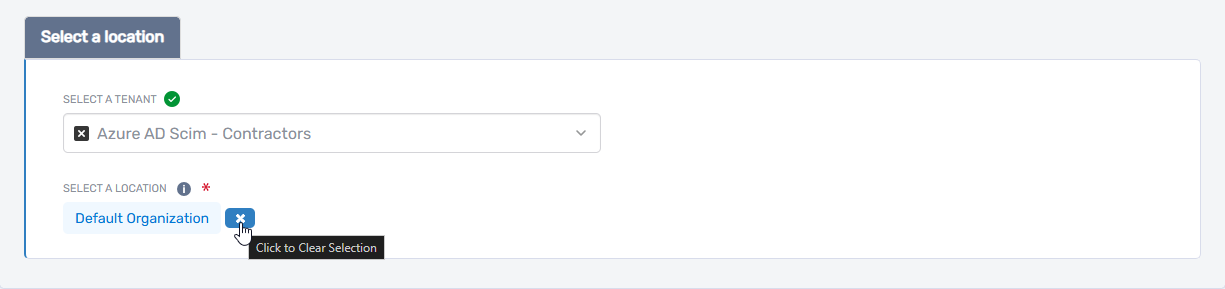
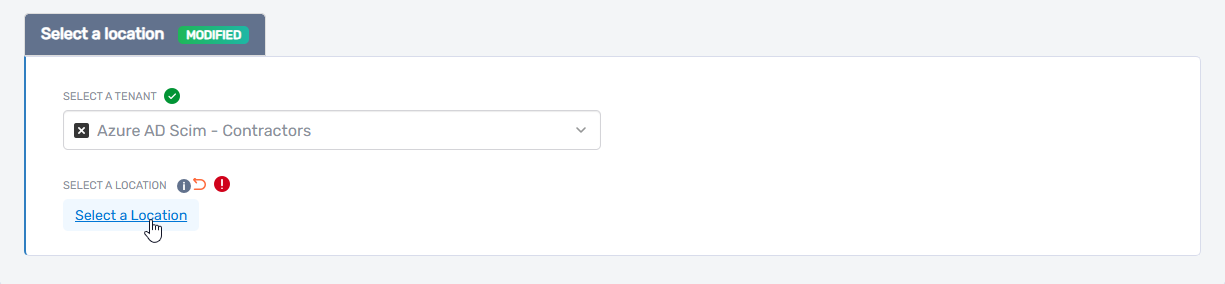
Under Select a Location, choose the EmpowerID location to assign for RBAC and visibility. If a default location is already selected and you wish to change it:
- Click the × (delete) icon next to the current location to clear it.
- Click Select a Location to open the location picker.
- In the picker, do one of the following:
- Browse the location tree
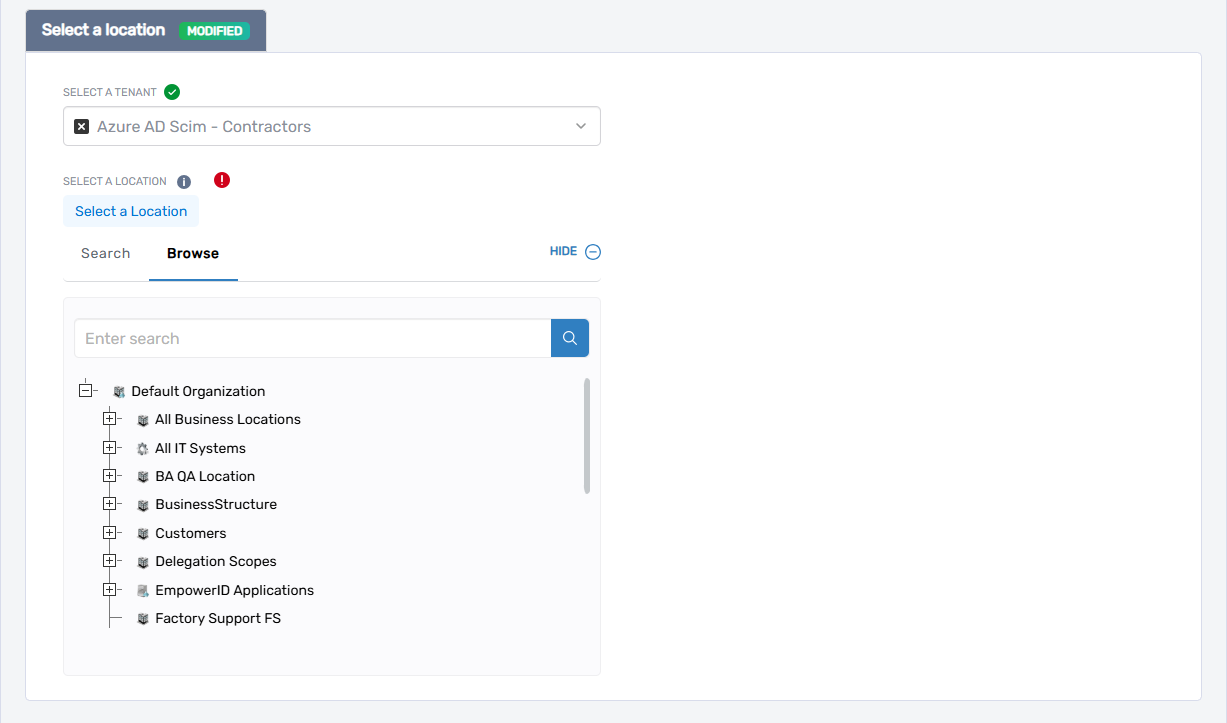
- Search for a location using keywords
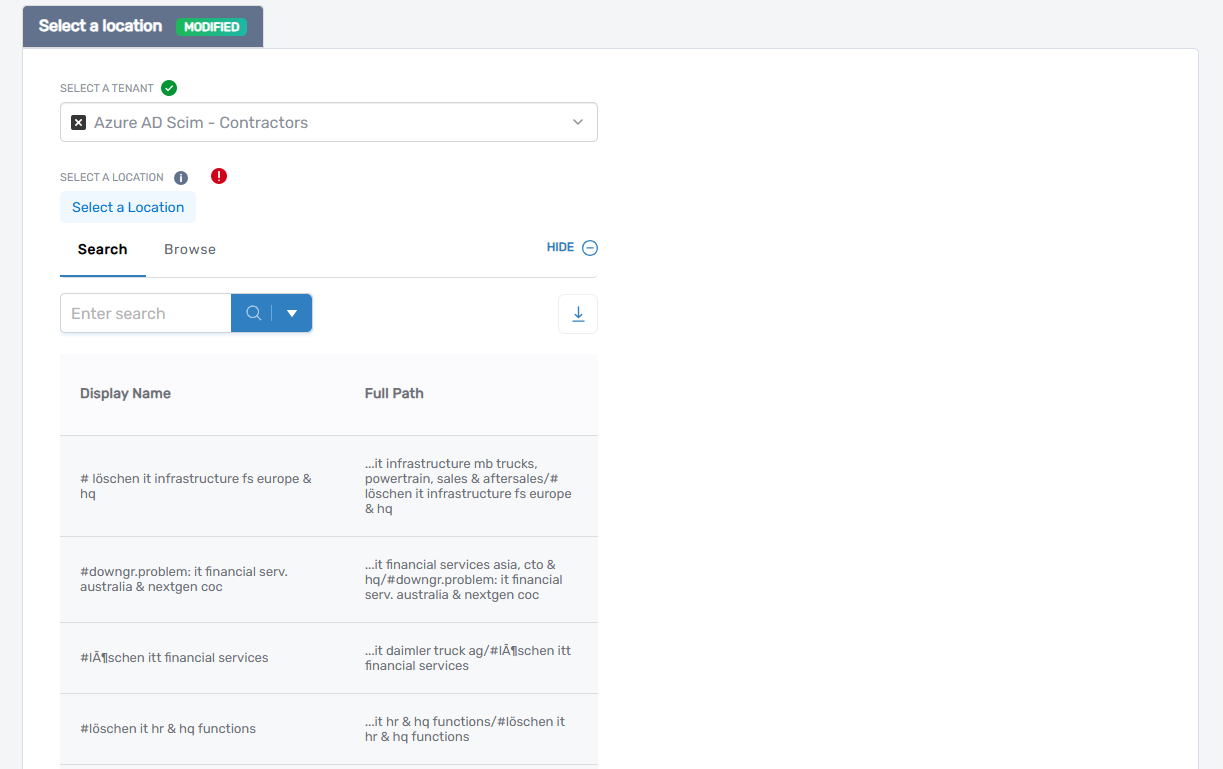
- Browse the location tree
- Click the desired location to select it.
- Click the × (delete) icon next to the current location to clear it.
-
Click Next to proceed to the Application Instance step.
If You Selected Gallery Enterprise Applications (SAML)
You will now be prompted to choose a predefined application from Microsoft’s application gallery.
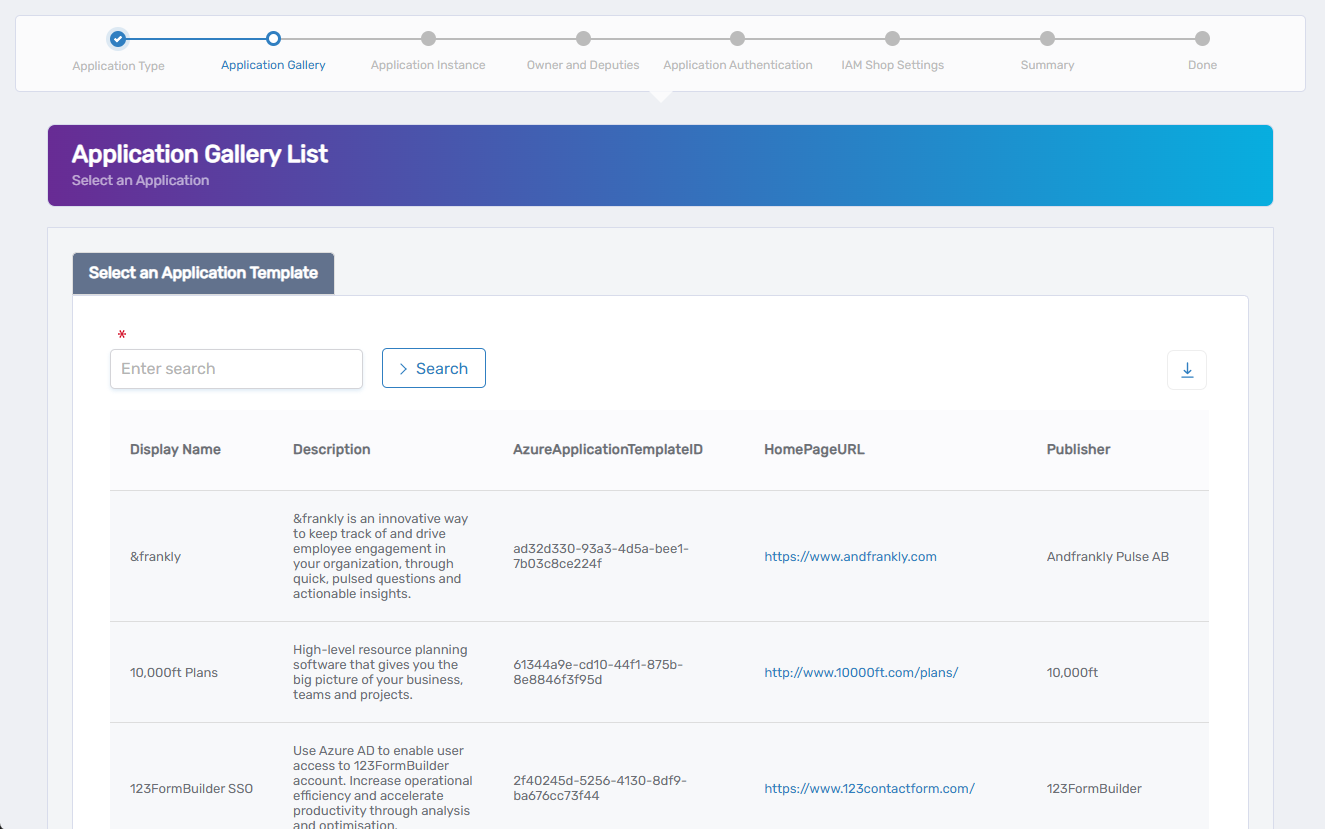
- Use the Search bar to find the application template.
- Click the row to select the desired app.
- Click Next to proceed to the Application Instance step.
This step appears only if you selected Gallery Enterprise Applications (SAML).
3. Define Application Instance and Supported Account Types
- Gallery Enterprise Applications (SAML)
- Non-gallery Enterprise Applications (SAML)
- Application Registration (OIDC)
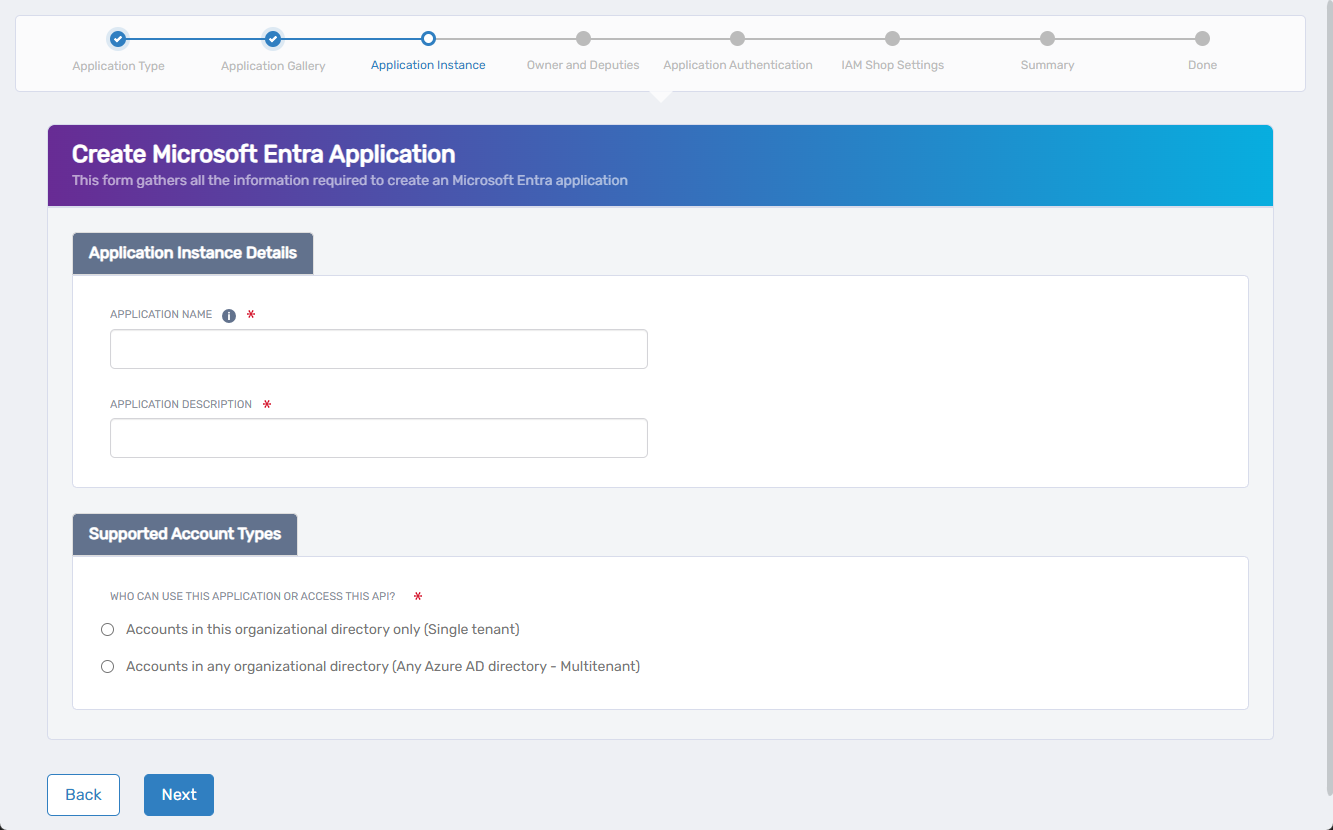
For gallery-based applications, provide application details and specify who can access it.
-
Enter the following:
- Application Name – The name shown in EmpowerID and Microsoft Entra.
- Application Description – A description to help identify the app.
-
Under Who can use this application or access this API?, select one of:
- Accounts in this organizational directory only (Single tenant)
Only users from your Microsoft Entra tenant can access the app. Use for internal-only applications. - Accounts in any organizational directory (Multitenant)
Users from any Microsoft Entra tenant can sign in. Suitable for B2B or external collaboration.
- Accounts in this organizational directory only (Single tenant)
-
Click Next to continue.
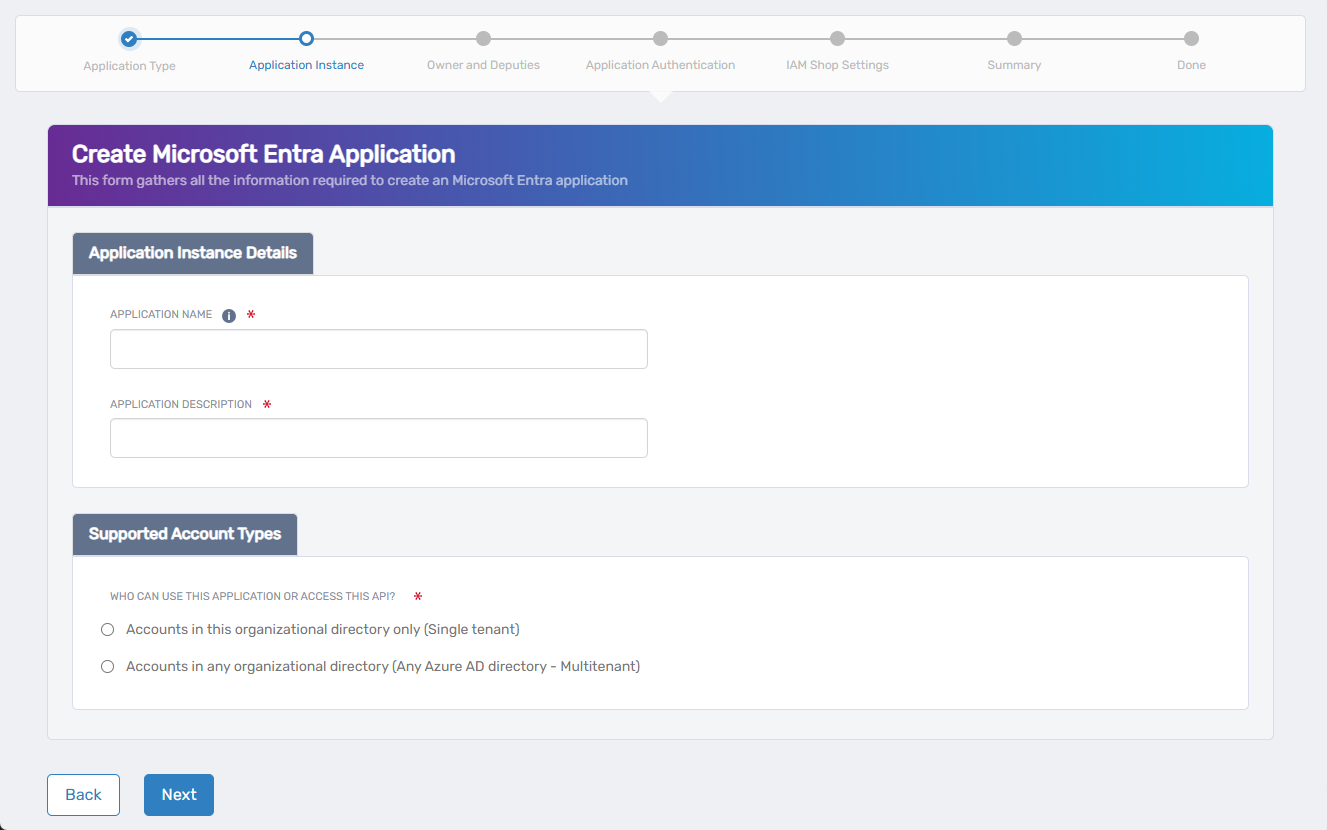
For custom SAML apps, dprovide application details and specify who can access it.
-
Enter the following:
- Application Name – The name shown in EmpowerID and Microsoft Entra.
- Application Description – A description to help identify the app.
-
Under Who can use this application or access this API?, select one of:
- Accounts in this organizational directory only (Single tenant)
Only users from your Microsoft Entra tenant can access the app. Use for internal-only applications. - Accounts in any organizational directory (Multitenant)
Users from any Microsoft Entra tenant can sign in. Suitable for B2B or external collaboration.
- Accounts in this organizational directory only (Single tenant)
-
Click Next to continue.
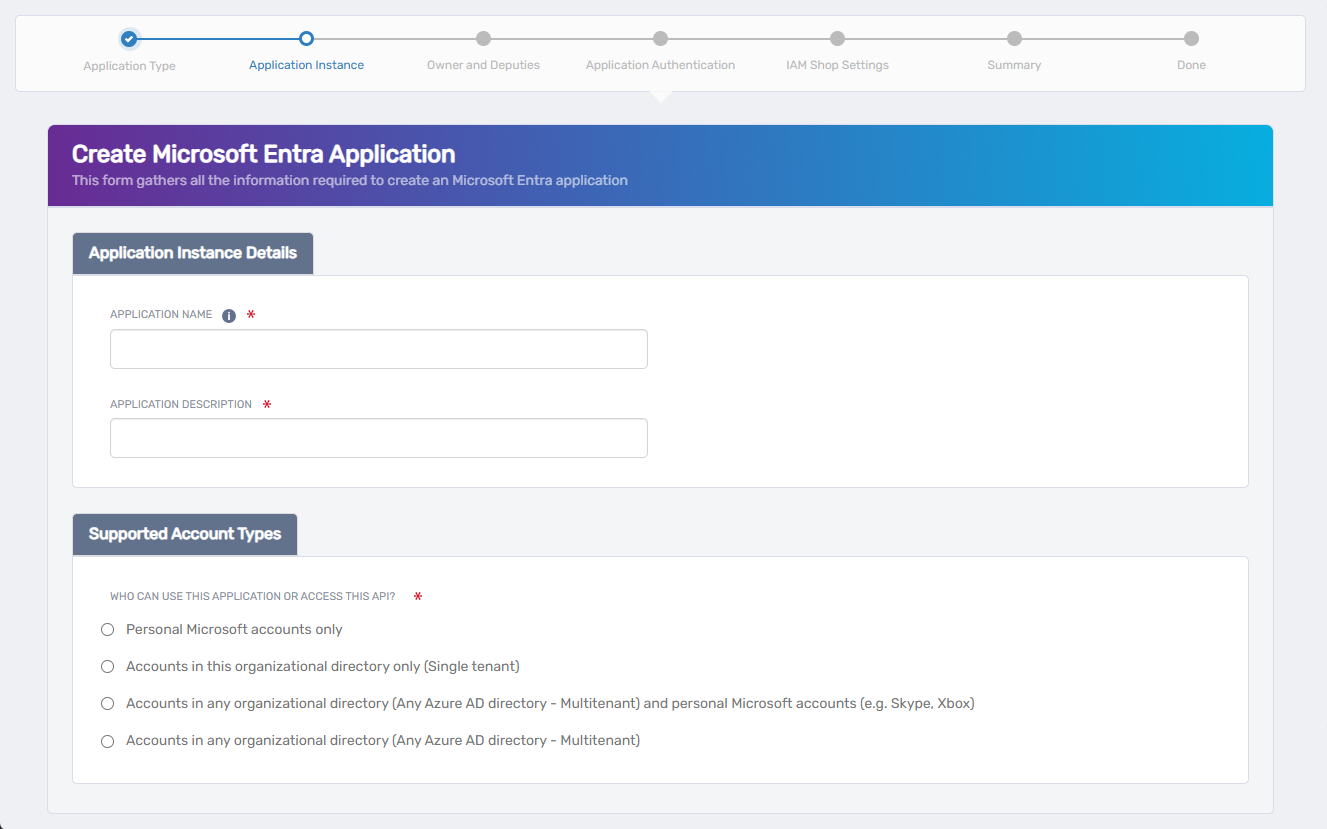
For OpenID Connect and OAuth-based applications, provide identity details and select supported account types.
-
Enter the following:
- Application Name – The name shown in EmpowerID and Microsoft Entra.
- Application Description – A description to help identify the app.
-
Under Who can use this application or access this API?, choose one of the following options:
- Accounts in this organizational directory only (Single tenant)
Only your organization’s Entra users can sign in. - Accounts in any organizational directory (Multitenant)
Users from any Microsoft Entra tenant can sign in. - Accounts in any organizational directory and personal Microsoft accounts
Both enterprise (work/school) and personal Microsoft accounts (e.g., Outlook.com, Xbox) can access the app. - Personal Microsoft accounts only
Only Microsoft consumer accounts can access the app. Use for public/consumer-facing scenarios.
- Accounts in this organizational directory only (Single tenant)
-
Click Next to continue.
4. Assign Application Owner and Deputies
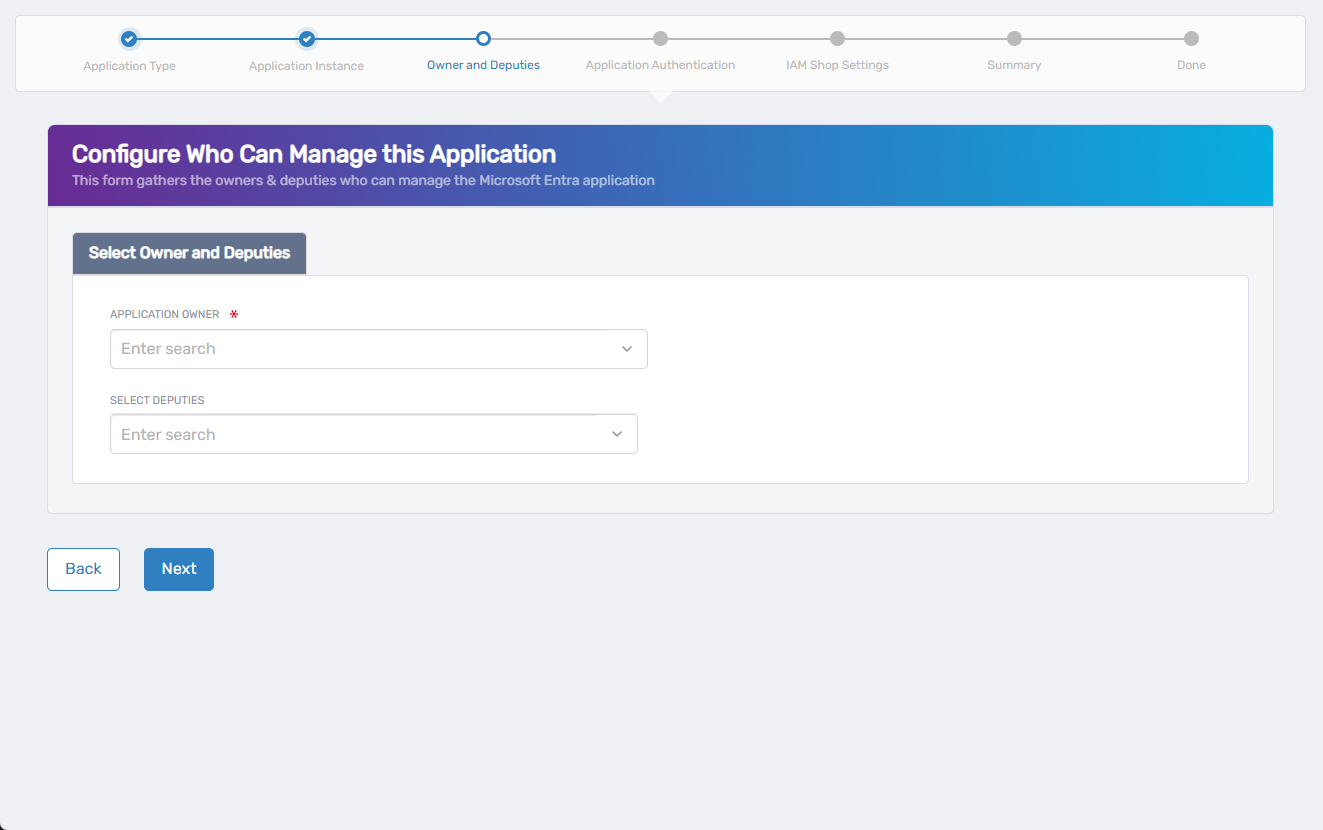
In this step, you specify who is responsible for the configuration and management of the application in Microsoft Entra.
-
In the Application Owner field, ssearch for and select the primary owner of the application.
- This person must have an account in the selected Microsoft Entra tenant.
- The selected user will be assigned the Configuration Owner role in Microsoft Entra.
-
In the Select Deputies field, optionally search for and add users who can act on behalf of the owner.
- These users must also have accounts in the selected tenant.
- Deputies also receive the Configuration Owner role.
📌 Assigning deputies ensures continued management availability if the primary owner is unavailable.
-
Click Next to continue.
5. Configure Application Authentication
In this step, you'll define how users authenticate to the application. The fields shown vary based on the integration type you selected earlier in the workflow.
- SAML (Gallery or Non-Gallery)
- OIDC (Application Registration)
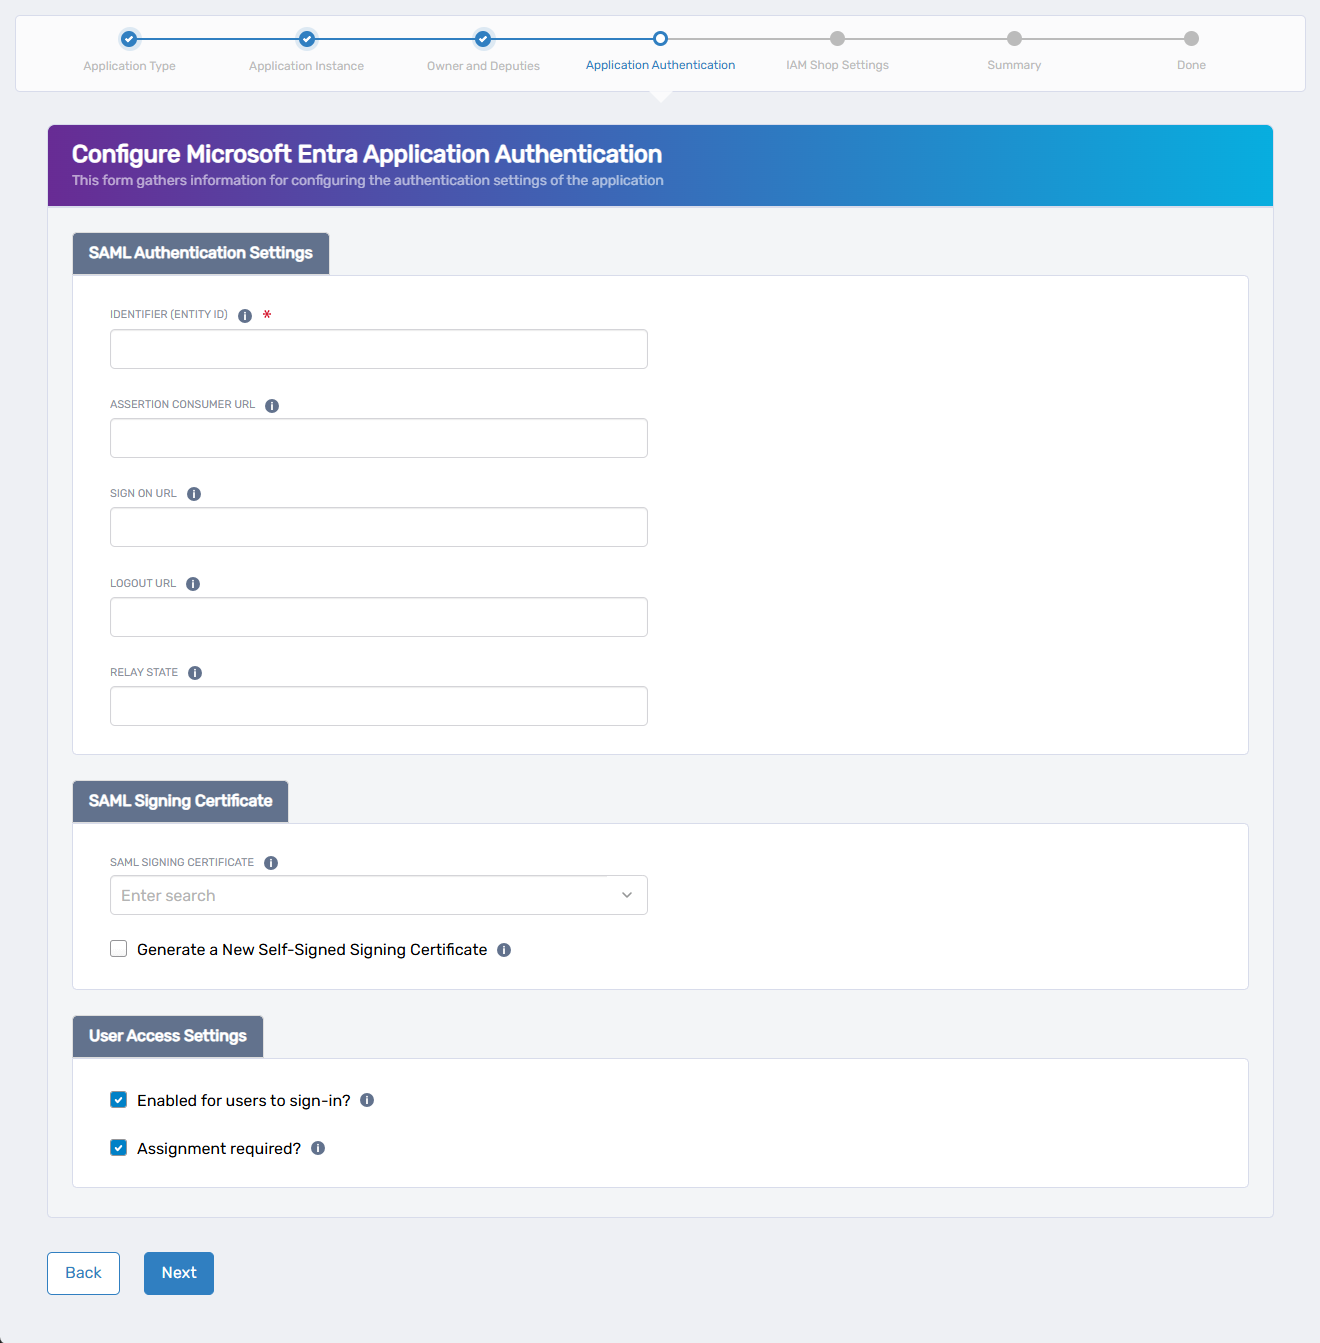
For SAML-based applications, complete the following steps to configure authentication and access settings.
-
Configure SAML Authentication Settings:
- Identifier (Entity ID): Enter the unique identifier expected by the service provider.
- Assertion Consumer URL: Provide the URL where EmpowerID should post SAML responses.
- Sign On URL (optional): Specify the login URL for initiating SAML authentication.
- Logout URL (optional): Enter the endpoint used to initiate logout.
- Relay State (optional): Provide an opaque state parameter to include during authentication.
-
Configure the SAML Signing Certificate:
- Select an existing certificate from the dropdown,
- or check Generate a New Self-Signed Signing Certificate to create one automatically.
-
Set User Access Settings:
- Enabled for users to sign-in? – Allows users to authenticate to the app.
- Assignment required? – Restricts access to explicitly assigned users only.
-
Click Next to continue to the next step.
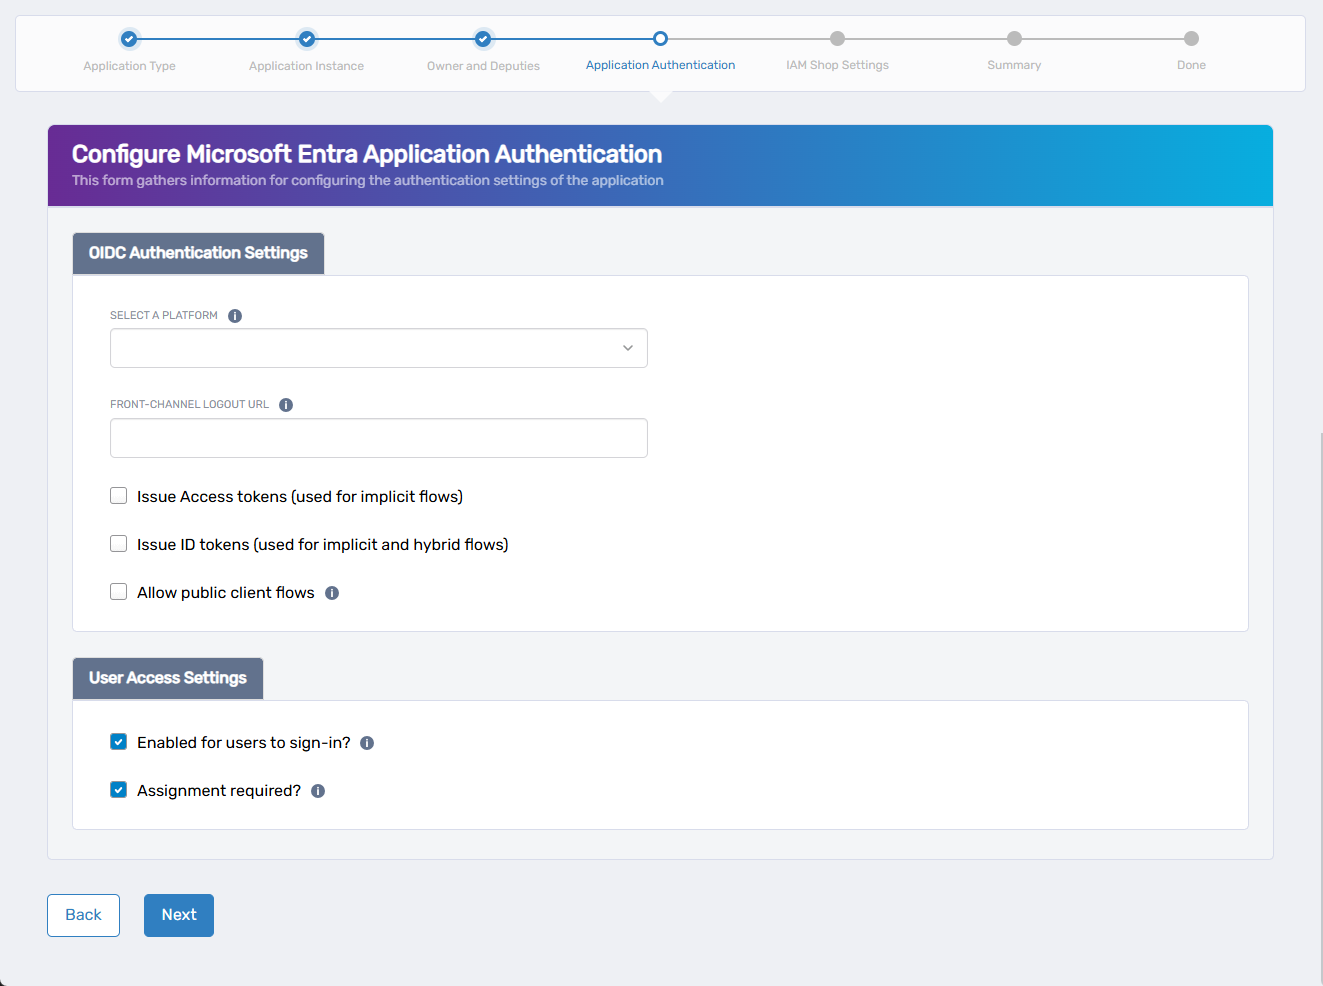
For OIDC-based applications, complete the following steps to configure authentication and user access.
-
Select the Application Platform:
Under Select a Platform, choose the type of application you are configuring:
- Web – For server-rendered apps using back-end authentication flows.
- Single-page application – For browser-based apps using JavaScript frameworks.
- Mobile and desktop applications – For native apps on iOS, Android, or Windows.
-
Configure Optional Authentication URLs and Token Settings:
- Front-Channel Logout URL (optional): Enter the URL where users should be redirected after logout.
- Issue Access tokens: Enable if the app requires access tokens for calling APIs.
- Issue ID tokens: Enable if the app uses OpenID Connect authentication flows.
- Allow public client flows: Enable for apps that cannot securely store a client secret (e.g., public/native apps).
-
Set User Access Settings:
- Enabled for users to sign-in? – Allows users to authenticate to the app.
- Assignment required? – Restricts access to users explicitly assigned.
-
Click Next to continue to the next step.
6. Configure IAM Shop Settings (Optional)
Use this step to make the application requestable through the IAM Shop. This setting is disabled by default. If you do not want to make the application available in the IAM Shop, simply click Next to continue to the next step.
If you do want to configure IAM Shop availability, complete the following:
- Check the Requestable In IAM Shop box.
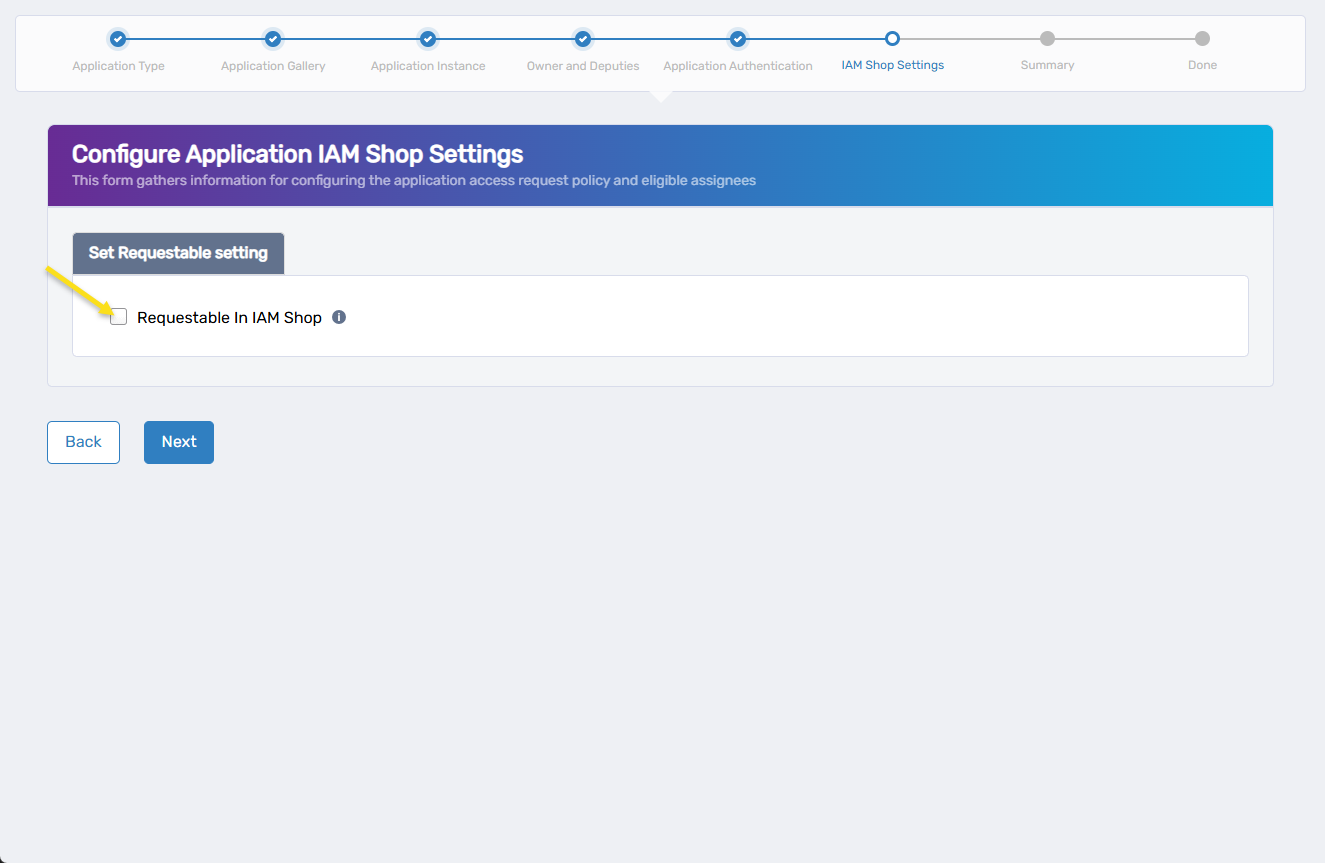 Additional configuration settings appear.
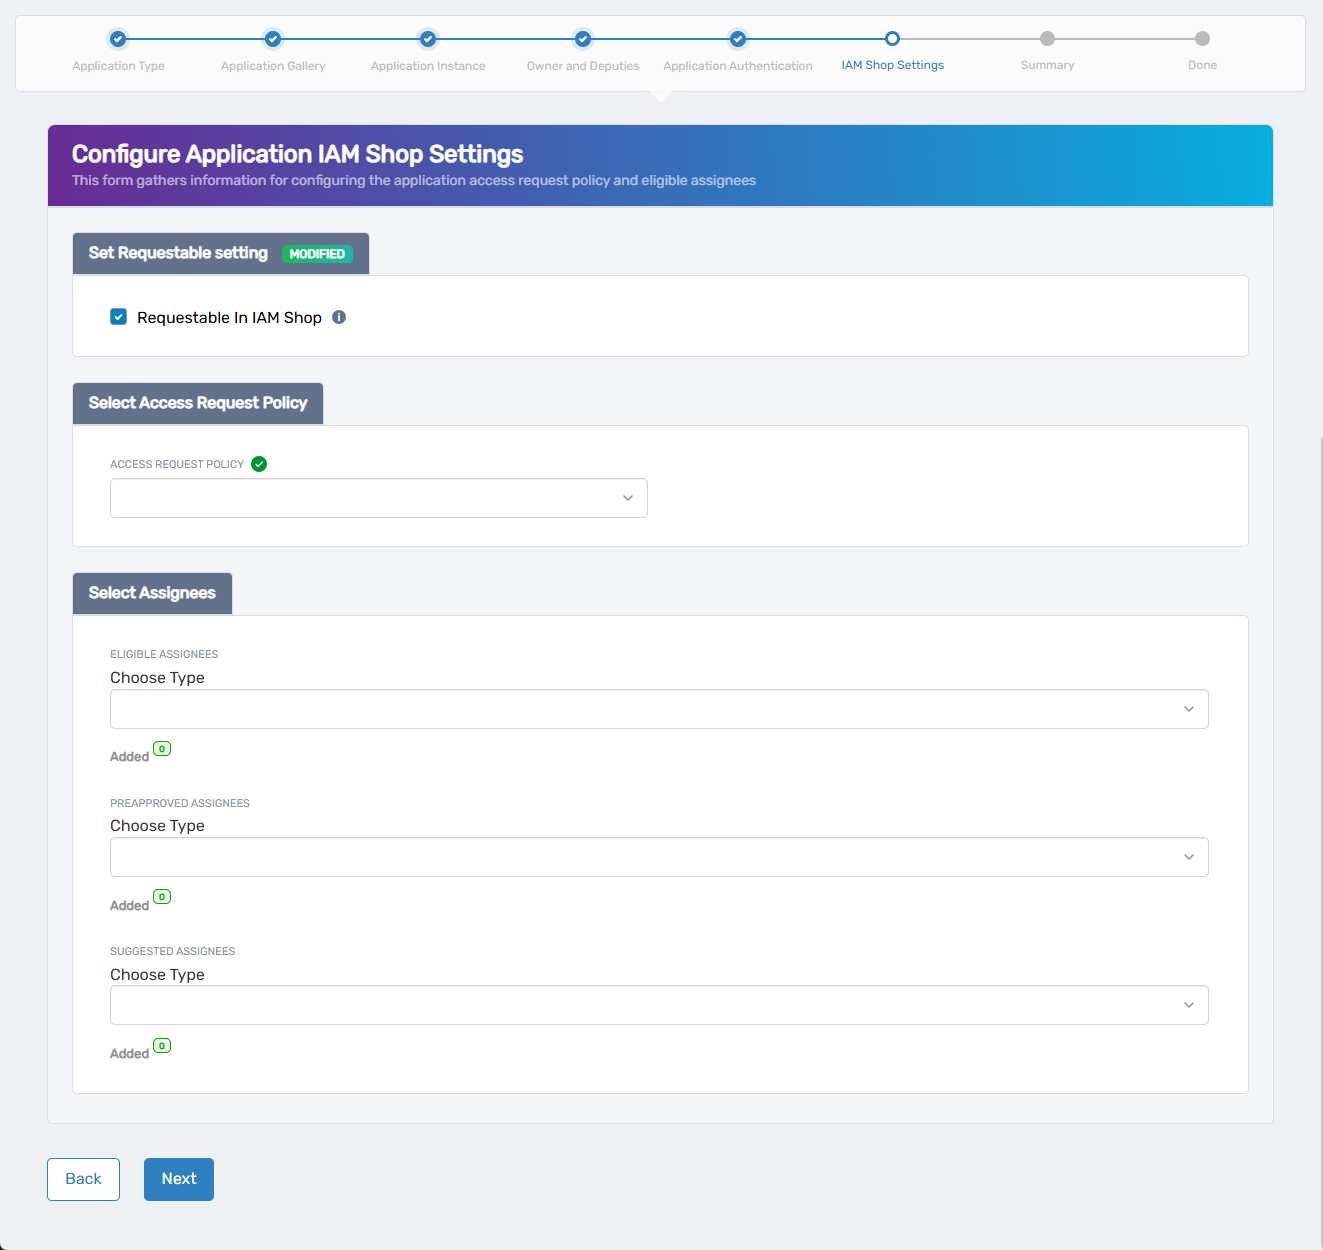
- Select an Access Request Policy to control how user requests are routed and approved.
- Under Select Assignees, define who can access or be suggested for this application:
- Eligible Assignees – Users who can request access to the application. Their requests generate business requests that follow the approval process defined in the access request policy.
- Preapproved Assignees – Users who are automatically granted access without needing approval.
- Suggested Assignees – Users who see the application as suggested in the IAM Shop. Like eligible assignees, their requests generate business requests and follow approval routing.
- Click Next to continue.
7. Review and Confirm Application Details
This step allows you to review all the application information entered throughout the wizard before submission.
-
Review the details displayed on the Summary screen. These include:
- Application Integration
- Application Authentication
- IAM Shop Configuration
-
If any information is incorrect or needs to be updated:
- Click the Back button to return to the appropriate step.
- Make your changes and proceed forward again to the summary.
-
Once you’ve confirmed all information is accurate, click Submit.
-
Click Submit on the Fulfillment screen.
8. Completion and What Happens Next
Once you click Submit, EmpowerID finalizes the onboarding process for your Microsoft Entra application.
What happens next depends on how your workflow is configured:
- If no approval is required, the application is created immediately in Microsoft Entra and becomes available for lifecycle and access management in EmpowerID.
- If approval is required, a business request is created and routed to the designated approvers. The application will only be created after all approvals are completed.
You’ll see a confirmation message when the request is submitted successfully.
After Onboarding
After onboarding, the application can be managed from the Applications section in the Resource Admin portal. From there, you can:
- Update application metadata
- Assign or revoke user access
- Configure additional policies, claims, or permissions