Upgrading EmpowerID
Overview
The first step in any upgrade process is to learn about the process itself so that you can plan and prepare appropriately. This article will help you understand the entire EmpowerID upgrade process, beginning with the relevant background information one should be aware of before starting the upgrade process.
As IAM implementations are complex by nature and typically impact the most sensitive and integrated enterprise directories and applications with the technology infrastructure, successfully upgrading EmpowerID cannot be taken without understanding the processes involved.
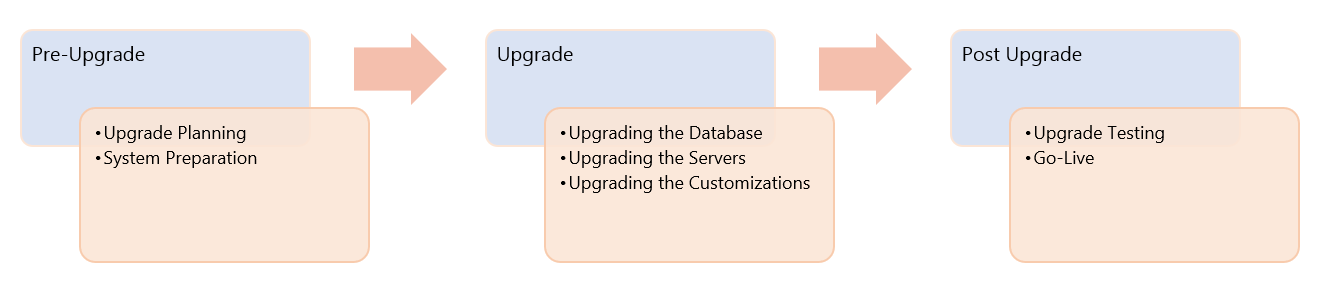
The below image shows the flow for performing a successful upgrade:
Planning and System Prep
When upgrading EmpowerID, you must be logged in as a user with rights to alter the EmpowerID database on the target SQL server. Additionally, please make sure you have saved any customizations to EmpowerID workflows in a custom package to avoid having the restoration process overwrite your custom workflows.
This phase of the upgrade process is for determining the "why" and "what" for performing an upgrade. You should determine beforehand the reason for the upgrade, what is the goal of the upgrade and what is expected from the upgrade. This includes the following points:
- You should document the reason for the upgrade. For example:
- To use new product features
- Running an unsupported EmpowerID version
- To fix a blocking issue that cannot be patched
- You should document the EmpowerID version and user stories currently used in your production environment. This helps ensure the integrity of the upgrade.
- You should document any blocking and critical support issues occurring in your current version. This helps you determine whether the new version addresses those issues.
- You should review the hardware and software requirements for new version (SQL, .NET, PowerShell etc.).
- You should run the EmpowerID System Prep tool to check whether your current environment supports all system prerequisites needed by the new version.
You can download the EmpowerID System Prep tool at https://support.empowerid.com/hc/en-us/articles/205653018-How-to-use-the-EmpowerID-System-Preparation-Tool
After determining that your system meets the requirements for the upgrade, you need to do the following to prep your system for the upgrade process:
- Backup/Export the HKEY_LOCAL_MACHINE\SOFTWARE\TheDotNetFactory registry hive on each of the EmpowerID servers.
- Copy the upgrade source files to each of the EmpowerID servers that will be upgraded.
- From the DBUpgradeUtility folder you just copied, run the msi program. If the installer says there is already a newer version installed simply cancel and move on.
- Perform a full backup of the EmpowerID database for system rollback if required.
- For purposes of being able to roll back quickly in the event of complications or errors in the upgrade process, we recommend leaving the existing EmpowerID servers untouched with the services turned off until the upgrade has been successfully completed and verified on the first server. We recommend performing the upgrade on one of the Web Servers initially.
- Stop all services and IIS processes on all EmpowerID servers.
- Copy the ..\program files\TheDotNetFactory directory from the Web server that you will be performing the upgrade on to a backup location that can be accessed later if required.
- Uninstall EmpowerID from the server you are upgrading and then restart the server.
Upgrading the Database
The first step in performing the upgrade of EmpowerID is to update the database with the new schema and default data required by the new version of EmpowerID. This section walks you through using the SQL tools and scripting required to perform this upgrade.
DBUpgradeUtility
This utility application is used to upgrade the target database with any new schema elements as well as any additional default data records that are required by the new version of EmpowerID. The method of upgrading the schema of the database is to generate an XML file with the current database schema of the target database (your current EmpowerID database), compare it to the shipping version XML file provided, and then generate an XML file with the deltas between the two XML files. This Delta file will then be used to upgrade the schema of the target database.
Once the schema has been upgraded, a series of SQL scripts will be run against the target database to populate any missing default data records into the database that are necessary for the new functionality of the upgraded EmpowerID system.
Database Upgrade Process
The database upgrade should be performed from one of the tools servers that has the SQL Management Studio loaded. Within these instructions, "Target Database" will refer to the EmpowerID database that is being upgraded, and "Source Database" will refer to the new database reference database that was restored to the SQL server.
The process for upgrading the EmpowerID database differs depending on your current version of EmpowerID. If you are using a build that is prior to 142 you need to first follow the steps for upgrading the database to build 142 and then follow the steps for upgrading the database from build 142 to the latest version of EmpowerID. If you are upgrading from build 142 or newer, go directly to step two.
DB Upgrade Step 1: Upgrading the EmpowerID Database to Build 142
The upgrade must be performed in a Development environment first. Please review Upgrading EmpowerID#Upgrade Best Practices before you continue.
- Download the SQL upgrade utility by pointing your browser to dl.empowerid.com/SQLUpgradeUtility.zip.
- Download the clean database backup file for the version of EmpowerID that you are upgrading to. Make sure all the prerequisites are on the server.
- Stop all services on your EmpowerID servers.
- On the SQL server in which you are upgrading the EmpowerID database, perform a restore of the clean database backup file. Name the database as EmpowerID_version Number (e.g., EmpowerID_6.0.142.0).
- From the SQL Upgrade folder, run UI.exe as an administrator to start the schema upgrade process. This can be run on any server as long as it has connectivity to the SQL server that has the original EmpowerID database and the clean copy you are restoring. It doesn't need to be on the SQL server itself, but please download the Files in step 4 of the preparation on the same server you are running the Upgrade from).
If you have not run the prerequisites for the SQL upgrade utility then you might need to install SharedManagementObjects and SQLSysClrTypes located in the SQL Upgrade folder.
- In the first tab, Step 1- Create Definition Files, enter the fully qualified name of the SQL server into the Server field and the name of the Database you are upgrading into the Database field. For the output path, enter the path to the "Files" folder in the DBUpgradeUtility folder. Select the "For Target" radio button and then click the "Create Database Definition File" button. Please note that this process can take up to 40 minutes.
- Once the Definition has been created, click the OK button on the resulting dialog and then close the UI.exe program and verify that the target schema definition XML file has been created. The name of the file should be "EmpowerID.xml"
- Run the UI.exe again and select the "Step 2 - Generate Upgrade Scripts" tab. Select the source (provided by EmpowerID) and target definition (generated in the previous step) files and then click "Generate Upgrade Commands".
- Click OK when prompted to review differences between objects.
- Click Finish.
- Reopen UI.exe, select the Step 3 - Upgrade Target Database tab and then browse to the newly generated file.
- Click Upgrade to start the upgrade process against the target database. During this process the schema will be upgraded. Any conflicts or issues will be displayed with a window to correct any changes.
- Finally, open SQL Server Management Studio and run the batch files provided by EmpowerID against the target database. There should be six SQL files, named batch1.sql to batch6.sql. You must execute these files in numeric order, beginning with batch1.sql and progressing to batch6.sql.
DB Upgrade Step 2: Upgrading the Database from Build 142
- Download the SQL Upgrade folder by using the link given to you by the EmpowerID team.
- Download the PowerShell scripts used for upgrading the database by using the link given to you by the EmpowerID team. The name of the scripts will be applyDbChanges.ps1 and applyDbChanges.Methods.ps1.
- Move the PowerShell scripts into the folder downloaded from Step 1.
- Open a PowerShell session as an administrator and navigate the PS scripts location.
- Run the following command to execute all the schema changes, stage data import and sync data into the database:
.\applyDbChanges.ps1 -conStr 'Connection string From EmpowerID Server' -filesPath '.\' -execSql $true -importTblData $true
Once these steps are completed, perform an update statistics and then backup the upgraded database once more. You may now proceed to upgrading EmpowerID on the server.
Upgrading the Servers
For the EmpowerID Programs upgrade, you will go through the upgrade process on one of the web servers first, perform the workflow studio components updates, then go back and upgrade the remaining EmpowerID servers. The installation of the EmpowerID program will proceed normally through the standard installation process with one exception being related to the launching of the configurator. EmpowerID does not support the upgrade process in silent mode.
- Navigate in the registry to HKEY_LOCAL_MACHINE\SOFTWARE\TheDotNetFactory\EmpowerID and copy the EmpowerID Database Key into a notepad before uninstalling EmpowerID from the server.
- On the server where you uninstalled EmpowerID, launch the EmpowerID MSI and proceed through the installation process until the configurator launches. At this point, you will need to close the configurator without saving anything and then click Finish on the Installer to terminate the process.
- Locate the HKEY_LOCAL_MACHINE\SOFTWARE\TheDotNetFactory\EmpowerID registry and edit the EmpowerID Database Key and Default Web Server URL and WebServerUrl key values to that for your environment.
- Launch the configurator in install mode by opening a command prompt and enter the following command, including the quotes:
"c:\Program Files\TheDotNetFactory\EmpowerID\Programs\ EmpowerID.Configurator.exe" install
- This opens the configurator and pulls in the settings of the previous installation from the database. Review the settings and adjust any that need to be changed for this installation.
The settings on the Web Server, Web Applications, and Services panels will need to be re-selected in order to set the new web site and services configuration. You will also have to re-enter the service identity credentials.
- Allow between 15 and 30 minutes for the Web Role service to register its workflow assemblies in the Global Assembly Cache.
- Once the process has finished, attempt to log in to the Web portal to verify that the system is properly functioning.
Upgrading the Customizations
If you have made any customizations to EmpowerID interfaces, workflows, components and other items, you will need to address each of the below as applicable for your environment.
Web Overrides and CDN (Theme) Overrides
- Copy the EmpowerID.Web.CDN folder to the Program Files\TheDotNetFactory\EmpowerID\Web Sites folder and confirm to overwrite existing files.
- Copy the EmpowerID.Web.Overrides folder to the Program Files\TheDotNetFactory\EmpowerID\Web Sites folder.
- Search for and run the EmpowerID Configurator one more time. On the Miscellaneous tab press the green arrow to execute the minification bundler to re-minify the JavaScript that was added in the CDN scripts folder. Press OK at the success prompt and then close the configurator without saving.
Republishing Workflow Studio Items
Any customization that has been done to workflows, libraries and components in EmpowerID will need to be republished. To do so, you need to manually republish EID Components and perform a batch refactor and publishing of all customized objects. The below steps demonstrate how to do this.
EID Components
The first item that will need to be republished is the EID Components class library. This class library contains the critical extensions and dependencies that many of the other class libraries and workflow objects require to function.
- Open Workflow Studio and log in as an All Access user.
- In the Source Control panel on the left side of the page, browse to the Class Libraries area and then double-click EID Components to open it.
- Click the Compile and Publish button located on the menu above the Workflow Studio designer.
- Follow the publishing wizard to completion, clicking No when prompted about restarting services.
- Once the publishing is complete, close Workflow Studio, restart IIS and the Web Role Service and then re-open Workflow Studio.
Bulk Refactor Customizations
- From Workflow Studio, click the Build tab and then click the Batch Build button.
- In the Batch Build area, select the objects to be refactored and published.
When selecting objects to be refactored, do not select any Alert Event Receivers. These must be republished manually. This is demonstrated in step 7.
- Click Refactor and publish.
- In the message box that appears, click Yes. Workflow Studio will now begin recompiling and republishing items. Workflow Studio will restart multiple times as it progresses its way through the various publishing steps for each of them.
If there is an error during publishing of workflows, Workflow studio tries to republish the failed ones and keeps on restarting without any progress. If you observer such behavior, run the query: "Select * from BPMRefactorItem" and make a note of output rows. Then, delete the rows corresponding to the failed workflows from BPMrefactorItem table using the following query: "Delete BPMRefactorItem". Let the EmpowerID team know about this.
- Once Workflow Studio has completed refactoring and republishing the bulk items, it will end with a dialog box that shows the completed items. At this point, go ahead and restart the workflow studio.
- The final step is to manually republish the two Alert Event receivers. In Workflow Studio, open each of the event receivers (Account Lockout Alert Handler, Person Lockout Alert Handler) and press the compile and publish button, following the same process as you followed when compiling and publishing the EID Components class library. Once these are published, you may close Workflow Studio.
- To complete the upgrade of this first server and ensure that all customized objects are properly active, stop the EmpowerID Web Role service, reset IIS, and then restart the web role service.
- Upgrade the remaining EmpowerID servers by repeating the server upgrade procedure section of this document for the remaining servers. You do not have to repeat the workflow studio processes for the remaining servers. Once all servers have been upgraded, you may start the Worker Role Service on the application servers.
Upgrade Testing
IAM implementations are among the most complex deployments that an organization can take on as they typically impact the most sensitive and integrated enterprise directories and applications within the technology infrastructure. The implementations require both EmpowerID and Customer resources with a wide array of expertise. Proper and thorough testing is key to a successful completion of IAM projects. In a typical upgrade, testing includes the following:
Smoke Testing
This is performed to validate proper functionality of the system after the upgrade. The specific areas of testing are:
- Connectivity and communication between the EmpowerID servers and services
- Connectivity and communication with the EmpowerID database
- EmpowerID Management console and web interface operation
- Proper working of the out-of-the-box workflows
- Validate the resource requirements (memory, disk, DB temp files, transaction log sizes etc.) for the new version
Integration Testing
This is performed to validate specific components, bug fixes and customizations and testing the system as a whole after the upgrade. It focuses on workflows that have been customized and implemented for the customer. The teams should use a risk-based approach focusing on lessons learned from prior upgrades (JIRA cases and patches delivered since last upgrade). As an example, a custom workflow is tested to ensure it executes without errors and that the data is valid after workflow execution. This testing is not meant to validate every single scenario in the requirements documents or prior statements of work. The responsibility of testing each detailed scenario must be covered as part of a detailed UAT test plan.
User Acceptance Testing (UAT)
This testing is always performed by customer staff. This team should include end users of the system. The objective here is to conduct end-to-end testing of user stories and scenarios to ensure the system is fit-for-purpose. UAT should include a dedicated team of end-users for testing and providing feedback. This phase is the most common source for project delays. The UAT process should include reviewing prior statements of work, preparing detailed test cases covering all scenarios, assigning test cases, executing them and documenting results in an iterative manner. A typical UAT iteration looks like this:
- Write Test Cases
- Apply fixes in the dev lab
- Execute Test Cases
- Raise defects in JIRA
- Prioritize defects that must be fixed; defer other defects
- Fix prioritized defects (typically done by the EmpowerID dev team)
- Repeat 1-6
The UAT phase typically takes 1-3 sprints (2-6 weeks) and could be longer depending on the complexity of the system. This is usually followed by a final hardening sprint (2 weeks) to complete regression testing and prepare the solution for production deployment. It should be understood that acceptance testing could go on indefinitely if not properly staffed and planned or if there is no proper classification of issues. Since it can become economically feasible to closure every issue, the issues are either deemed as "must-haves" or "deferred" for a future release.
The customer must communicate the timeframe for completing the UAT testing (needed for the Project Plan) and provide adequate time to EmpowerID for addressing "must-have" issues. EmpowerID will make efforts to address the prioritized issues as quickly as practical, since the UAT is the last stage prior to the sign-off from customer. The customer is expected to accept the solution after the "must-have" issues have been addressed.
Additional Information
What are the best practices for upgrading EmpowerID?
- Test the entire upgrade in a Development environment first, then in Staging and finally in Production. The Staging environment upgrade must begin after fixing all issues and adjusting all procedures uncovered during the development environment upgrades. The Development environment is typically upgraded multiple times to ensure incident-free upgrade process for Staging and Production environments
- Review sizing requirements for the new version and adjust all your environments (Development, Staging and Production) for additional computing capacity if required
- Test plan should include detailed post upgrade functional and performance tests
- Identify and capture diagnostics logs and create JIRA issues so that the support team can effectively assist you
- During testing in the development environment, review event logs for errors
What are the different types of EmpowerID releases?
- Hot fix — these are only meant to fix issues deemed blocking or urgent; these are unplanned and scheduled as needed
- Patches — these are planned rollups of multiple fixes supplied in a convenient package; these are unplanned and scheduled as needed
- Minor updates — these are mini-releases that include several patches as one convenient mini release; these are unplanned and scheduled as needed
- Service packs — these are planned releases to introduce major features; typically, the cadence is 6-9 months
- Major Releases — these are released on a yearly schedule
EmpowerID supports the current and previous major version of the software. As an example, EmpowerID currently supports all 2019 and 2018 versions
What do I get with EmpowerID Technical Support / What is covered under my support and maintenance contract with EmpowerID
The technical support team provides ongoing support and guidance to customers using EmpowerID. Customers will also have access to all fixes, updates, fixes and patches. This is the customers first line of help for understanding and using EmpowerID. The process involves opening a ticket in JIRA, an online issue tracking system, and interacting with technical support personnel through JIRA (primarily), online GoToMeeting sessions and email/phone. Technical Support must be renewed annually for a fee. With Technical Support, the customer is in the driver's seat and responsible for supporting all end users. The customer is expected to have a trained and certified help desk proficient in using available resources such as project documentation, training materials and product documentation which is located at https://docs.empowerID.com etc. to effectively support their end users. EmpowerID Technical Support team is available to customer help desk personnel to offer guidance on troubleshooting EmpowerID specific issues, reviewing logs and to answer advanced questions that go beyond the material covered in product training.
How can EmpowerID Professional Services help me?
Professional services are meant for specific projects. Professional services pick up where Technical Support leaves off. This typically entails hands-on implementation and deployment activities such as software installation, system upgrades, configuration, systems integration, customizations (custom workflows, connectors, UI etc.), testing, personalized customer training and go-live support. Here, the customer defines the objectives, and the Professional services team will design, deploy and test the solution to achieve the objectives. This is an excellent option for customers that are short on time and trained staff and want to offload the work to EmpowerID. With Professional Services, EmpowerID is in the driver's seat, and must be able to remotely access customer systems to install and upgrade the software, configure it, write scripts (or perform code review or modify your existing scripts), integrate with other systems, perform troubleshooting etc. Professional Services is always accompanied by a statement of work which includes scope and cost information.
Labor Breakdown
Below is an example of the labor associated with an EmpowerID upgrade. Upon request, EmpowerID professional services can provide an estimate for your system upgrade. Other than creating the DB upgrade scripts, you may choose to perform all parts of the upgrade process.
| Task | Labor (man-days) |
|---|---|
| Planning | ~3 days |
| EmpowerID DB Upgrade | ~3 days (EmpowerID must create and provide the DB scripts for the upgrade; this should not be done by the Customer) |
| EmpowerID Server Upgrade (1 app server) | ~1 day |
| Upgrading the Customizations | ~5 days (depends on complexity) |
| Testing | ~10 days (depends on complexity) |
| User Acceptance Testing | ~10 - 30 days (UAT is done by customer's UAT team) |
| Go-live assistance | ~3 days |
| Sub Total | ~25 days |
| Project Management | ~5 days |
| Total | ~30 days |